Last Update: 20 December 2020
General
If you would like to download this section, please click on the following link:
Operating Manual for the Laser Rock Measure (PDF)
The Laser Rock Measure (LRM) device employs laser distance measuring technology to determine the distance a rock is from the dead-centre of the pin. The laser itself is set back 0.15m (15 cm) from the dead-centre of the pin which permits the device to accurately measure rocks that are biting the pin. This set back (0.15m) should be subtracted from readings on the laser if the rock's actual distance from the dead-centre of the pin is desired.
The LRM has been designed to maintain the laser beam parallel to the ice surface when it is resting flat on the ice surface. This is important so the laser beam will strike the same height on a rock's hitting band no matter how near or distant it is from the pin.
Through the course of manufacturing the LRM we have made a number of design improvements as follows:
The GLM 15 display can be set for imperial (feet and inches) or metric (metres) measurements. With the laser measure turned off, hold the button down for several seconds. The display will alternate between metric and imperial measurements. Release the button to select your choice. For our application, we will assume metric measurements.
Note the display reads in metres; however, if we ignore the decimal point, we can read off the measurement in millimetres. Although the laser is a low power device its beam should not be intentionally or inadvertently directed into the eyes of anyone in the surrounding area. It is the responsibility of the user to assure that this does not happen. The providers of the LRM are not in any way responsible for the misuse of the device.
Reading the display on the LRM
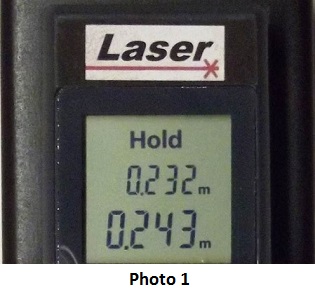 Using the bottom line in the display as an example, the reading is 0.243 m which is equivalent to 243 mm (or 24.3 cm).
Considering the 2 measurements in this example, the top reading (this would be the 1st measurement) is 0.232 m or 232 mm.
The 2nd measurement (bottom line) is 0.243 m or 243 mm. Thus, the 1st rock is 11 mm closer to the pin.
Using the bottom line in the display as an example, the reading is 0.243 m which is equivalent to 243 mm (or 24.3 cm).
Considering the 2 measurements in this example, the top reading (this would be the 1st measurement) is 0.232 m or 232 mm.
The 2nd measurement (bottom line) is 0.243 m or 243 mm. Thus, the 1st rock is 11 mm closer to the pin.Caution
Initial Set-up (LRMs with set screw)
Note: No initial set-up required for LRMs with the Auto-Adjust Pin
- Loosen the locking nut and turn adjustable set screw counter-clockwise until it will not touch the pin when the LRM is placed flat on the ice surface.
- Position the LRM so that the set screw is over the pin and then turn the set screw clockwise until it just touches the pin. Be sure the set screw does not lift the end of the LRM off the ice as this would cause the laser beam to not be parallel to the ice surface.
- Place a rock at outer edge of the house and turn on the laser beam (see Making Measurements section below). Note height where the beam strikes the hitting band of the placed rock and then move the rock into the four foot ring and observe where the beam strikes the hitting band. The height of two striking points should be within 1 cm of each other, if they are not it means that the laser beam is not parallel to ice surface. To correct this repeat Steps 1 and 2.
- Tighten the locking nut. Note - “finger tight” is usually adequate to hold the set screw in position.
Making Measurements with the LRM
1. Position the LRM so that the set screw is in the pin.
2. Push button on laser to turn LRM “ON”
- direct the beam at rock to be measured.
- adjust for closest measurement.
3. Push button again to “MAKE and HOLD” the measurement.
- laser beam will switch off.
- held measurement appears on bottom line of display.
4. Push button again to make another measurement.
- laser beam is switched on.
- held measurement moves to top line of display.
- direct the beam at the next rock to be measured.
- adjust for closest measurement.
5. Push button again to “MAKE and HOLD” second measurement.
- laser beam is switched off
- second held measurement appears on bottom line of display.
Note: a maximum of two measurements can be saved on the LRM display. These readings with be held on display for approximately four minutes.
Changing the battery on the LRM
When the battery low indicator comes on the LRM can still be used (for another 15 minutes or so) but when the indicator starts flashing, no further measurements can be made. Replace the 2 AAA cells with new alkaline cells.
For Versions V1 and V2:
Remove the 2 screws holding the stainless-steel strap in place with a #0 (yellow) Robertson screwdriver.
The GLM 15 laser measuring device is fitted into a recess in the wooden block. Grasp the GLM 15 and pull it out of the recess.
Note the small screw at the back of the wooden block. This screw is used to calibrate the angle of the laser measuring device so it will be parallel with the ice surface. Do not adjust this screw.
Remove the battery compartment cover (press latch at front of battery compartment) and remove the 2 AAA cells.
Install 2 new cells and replace the battery cover. Check to make sure the GLM 15 powers up and operates correctly.
Making sure the laser end faces the front of the LRM, press down firmly and evenly to make sure the GLM 15 is fully seated into the recess in the mounting block.
Fit the strap in place and install the 2 screws.
For Version V3:
Remove one of the screws holding the stainless-steel strap in place with a #0 (yellow) Robertson screwdriver.
Remove the laser measure from the wooden block.
Note the small screw at the back of the wooden block. This screw is used to calibrate the angle of the laser measuring device so it will be parallel with the ice surface. Do not adjust this screw.
Remove the battery compartment cover (press latch at front of battery compartment) and remove the 2 AAA cells.
Install 2 new cells and replace the battery cover. Check to make sure the laser measure powers up and operates correctly.
Making sure the laser end faces the front of the LRM, hold the laser measure against the raised lip at the back of the mounting block.
Fit the strap in place and hold securely while you install the screw.
Repeat the Initial Setup procedure before making any new measurements.
Making measurements with the LRM Plus
1. Position the LRM so that the set screw is in the pin.
2. Push the top button to turn the laser “ON”
- Direct the beam at rock to be measured.
- Sweep the rock face for lowest measurement.
3. Push button again to “MAKE and HOLD” the measurement.
- Laser beam will switch off.
- Lowest measurement appears on top line of display.
4. Push bottom button again to clear the display.
5. Repeat for next measurement.
6.Hold bottom button for 3 sec to turn laser “OFF”.
Changing the battery on the LRM Plus
A single ¼" screw is used to attach the GLM 50C to the base of the LRM Plus. Either a #3 Robertson (black) or slot screw driver can be used to remove the screw through a hole in the base. Once the screw is loosened, it will remain “captured” within the block.
Note the small screws at the back of the wooden block. These screws are used to calibrate the angle of the laser measuring device so it will be parallel with the ice surface. Do not adjust these screws.
Remove the battery compartment cover (press latch at front of battery compartment) and remove the 2 AAA cells.
Install 2 new cells and replace the battery cover. Check to make sure the GLM 50C powers up and operates correctly.
Re-attach the GLM50C to the block, holding it in alignment while the screw is tightened.
Tips on Using the LRM
Modes of use
During a curling match there are two situations where the LRM can be deployed. The first being measuring "draw to button", where the absolute distance of a rock from the centre pin needs to be determined. This measurement is frequently used to determine which team gets hammer in the first end and less often to break ties in games such as those played in the "Skins" format. The second situation is to determine shot rock during play of a match. The LRM can be effectively used in both situations and knowing its capabilities can make its use easier for the person making the measurement and those affected by the result. These two situations are covered separately below, but first one should understand how the laser measuring device displays the measurement data and the accuracy of those measurements.
Understanding the Display and the Accuracy of the LRM
The Laser display can be set for imperial (feet and inches) or metric (metres) measurements. With the laser measure turned off, hold the button down for several seconds. The display will alternate between metric and imperial measurements. Release the button to select your choice. For our application, we will assume metric measurements. For the photo on the right, the display reads in metres; however, if we ignore the decimal point, we can read off the measurement in millimetres. This means that the last digit on the right represents a millimetre which is slightly smaller than 40 thousands of an inch as a comparison to Imperial system. This accuracy is more than adequate for all measuring situations and better than most mechanical devices currently used in the sport.
In the photo, the upper reading would be for the first rock measured in shot determination during the play of a match. This reading shows the first rock to be 232 millimetres from the laser reference point. The lower reading indicates the second rock measured is 243 millimetres from the laser reference point. Therefore the first rock measured is shot by 11 millimetres.
It should be noted that the manufacturer of the laser measuring device, Bosch, publishes the measuring accuracy for any off the shelf device as plus or minus three millimetres. However, each laser measuring device incorporated in a RLM has been calibrated to read to within one millimetre which assures that the LRM is capable of the accuracy described in the previous paragraphs.
Measuring Draws to the Button
The major advantages of the LRM for this situation are its accuracy and its ability to easily measure to the dead-centre of the pin. The latter has become increasing important as teams have become very efficient at getting their last rock draws very close to the pin. This capability is due to a set-back in the laser measuring reference point and design of the pin engagement mechanism on the base of the LRM. The measuring reference point is set back 150 millimetres from the dead-centre of the pin which means that 150 millimetres is included any rock measurement. For example if a measured rock reads 200 millimetres on the LRM, it is actually 50 millimetres from the dead-centre of the pin (i.e. 200 - 150 = 50). In most competitions that use draw to the button to determine hammer and the cumulative totals of such draws for tie breaking purposes, the officials enter the measurements in a computer based spreadsheet. Such spreadsheets can be made to automatically include subtracting the 150 millimetre set back from LRM measurements.
Making these measurements is straight forward and can be done by one person no matter how far the rock is from the button. The laser beam should be centered on the rock and this can be done by moving the beam back and forth across the rock's face and watching for the lowest reading. Once this reading is found the operator should depress the laser button and the reading will held on the display for at least four minutes, if not deliberately erased. However, after a limited amount of practice most operators can reliably find the rock's centre by visually centering the beam on the rock. This is possible because the curling rocks are relatively large in diameter (i.e. between 280 and 290 millimetres) and being off-centre by few degrees doesn't significantly affect the results for this type of measurement.
In “The Rules of Curling” as published by the World Curling Federation (WCF) a method for measuring Last Shot Draws (LSDs) that cover the tee is defined. Sections d and e of Rule C8 describe how the distance between the centre of the rock and the tee is determined as follows:
(d) Stones covering the tee will be measured from two locations at the edge of the 4ft circle.
(e) These two locations are at a 90° angle and 0.610 m (2 feet) from the centre hole (the tee).
These two measurements are then entered into a cell phone or tablet app which calculates the distance
between the centre of the rock and the tee. The app, which is called CurlDistance, is provided by the firm Curlit
of Switzerland and uses the calculation method provided by the WCF. CurlDistance has a feature which allows
a user to input the set- back distance of the measuring device that they are using. For the LRM this set-back is 15 cm which when selected allows LRM readings to be input into the app without modification which makes the LRM an ideal measuring device for this kind of measurement.
Measuring to Determine Closest to the Pin during Play
Using the LRM for this measurement is much simpler, quicker and more accurate than the method currently in use. However, it is new and requires learning how to make the measurements needed. It should be noted that there isn't any need to account for the laser measuring reference point set-back when determining which of two or more rocks is closer to the pin. All that matters is the relative difference between the readings. The following is a step by step description of a suggested process for determining which rock is closest to the pin.
- Position LRM on the pin, turn on the laser and point the
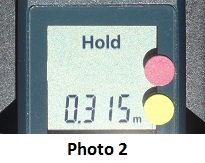 beam at the first rock to be measured. Move the beam back and forth across the face of the striking band until the minimum reading is found and then depress the laser button. This reading is now displayed and held on the bottom line of the display and the laser beam is turned off. An example of how this appears is shown in Photo 2. Note the LRM in the photo has been equipped with coloured dots to the right of the readings. These dots are lined-up with final position of measurement for the red rock and yellow rock if the red rock is measured first.
- Next depress the button on the laser and turn the LRM until the beam strikes the next rock to be
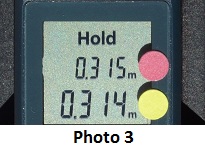 measured. Move the beam back and forth across the face of the striking band until the minimum reading is found and then depress the laser button. This turns off the laser beam and displays and holds this reading on the bottom line of the display. Also, the reading from the previously measured rock is moved to the upper line of the display next to the red dot as shown in Photo 3. If the laser button is not depressed these two readings will be held on the display for at least four minutes.
- The LRM can be lifted from the ice and the readings shown to the opposing thirds and the TV cameras if they are being used for the match. Of course the lowest of the readings is for the rock closest to the pin. For the example shown in Photo 3, the yellow rock is one millimetre closer to the pin than the red.
Things to be aware of
Occasionally, while the laser beam is being moved back and forth over a rock's striking band the laser will oscillate between two readings one millimetre apart. This indicates that the actual distance is somewhere between the two readings. The reading that the laser holds when the button is depressed is the one to use for the measurement.
The GLM 15 display can be set for imperial (feet and inches) or metric (metres) measurements. With the laser measure turned off, hold the button down for several seconds. The display will alternate between metric and imperial measurements. Release the button to select your choice.
Also, there are rare occasions while using the LRM during the play of a match where two rocks that need to be measured are resting quite close to the pin and there isn't room to get the LRM into a position to make the required measurements. However, the designers have developed the LRM Mirror Accessory (LMA) that can be easily attached to the LRM which resolves this situation. A description of the LMA can be found on the Products page.
LRM Compatibility with the Curl Distance App
To use the App for "Last Stone Draws" the distance is measured either from the centre of the house (the Tee) to the nearest point of the stone or, if the stone covers the centre, from two points 2ft away from the centre.
The app calculates the real distance from the centre to the centre of the stone in both cases, using the official formula from the World Curling Federation WCF. Values can be entered for up to six sheets.
If you would like to download more information about Employing a Laser Rock Measure (LRM or LRM Plus) to obtain input readings for the "Curl Distance" App, please click on the following links:
Employing a Laser Rock Measure (LRM) to obtain input readings for the “Curl Distance” App (PDF).
Employing a Laser Rock Measure Plus (LRM+) to obtain input readings for the Curl Distance App (PDF).
- direct the beam at rock to be measured.
- adjust for closest measurement.
3. Push button again to “MAKE and HOLD” the measurement.
- laser beam will switch off.
- held measurement appears on bottom line of display.
4. Push button again to make another measurement.
- laser beam is switched on.
- held measurement moves to top line of display.
- direct the beam at the next rock to be measured.
- adjust for closest measurement.
5. Push button again to “MAKE and HOLD” second measurement.
- laser beam is switched off
- second held measurement appears on bottom line of display.
Note: a maximum of two measurements can be saved on the LRM display. These readings with be held on display for approximately four minutes.
Changing the battery on the LRM
When the battery low indicator comes on the LRM can still be used (for another 15 minutes or so) but when the indicator starts flashing, no further measurements can be made. Replace the 2 AAA cells with new alkaline cells.
For Versions V1 and V2:
Remove the 2 screws holding the stainless-steel strap in place with a #0 (yellow) Robertson screwdriver.
The GLM 15 laser measuring device is fitted into a recess in the wooden block. Grasp the GLM 15 and pull it out of the recess.
Note the small screw at the back of the wooden block. This screw is used to calibrate the angle of the laser measuring device so it will be parallel with the ice surface. Do not adjust this screw.
Remove the battery compartment cover (press latch at front of battery compartment) and remove the 2 AAA cells.
Install 2 new cells and replace the battery cover. Check to make sure the GLM 15 powers up and operates correctly.
Making sure the laser end faces the front of the LRM, press down firmly and evenly to make sure the GLM 15 is fully seated into the recess in the mounting block.
Fit the strap in place and install the 2 screws.
For Version V3:
Remove one of the screws holding the stainless-steel strap in place with a #0 (yellow) Robertson screwdriver.
Remove the laser measure from the wooden block.
Note the small screw at the back of the wooden block. This screw is used to calibrate the angle of the laser measuring device so it will be parallel with the ice surface. Do not adjust this screw.
Remove the battery compartment cover (press latch at front of battery compartment) and remove the 2 AAA cells.
Install 2 new cells and replace the battery cover. Check to make sure the laser measure powers up and operates correctly.
Making sure the laser end faces the front of the LRM, hold the laser measure against the raised lip at the back of the mounting block.
Fit the strap in place and hold securely while you install the screw.
Repeat the Initial Setup procedure before making any new measurements.
Making measurements with the LRM Plus
1. Position the LRM so that the set screw is in the pin.
2. Push the top button to turn the laser “ON”
- Direct the beam at rock to be measured.
- Sweep the rock face for lowest measurement.
3. Push button again to “MAKE and HOLD” the measurement.
- Laser beam will switch off.
- Lowest measurement appears on top line of display.
4. Push bottom button again to clear the display.
5. Repeat for next measurement.
6.Hold bottom button for 3 sec to turn laser “OFF”.
Changing the battery on the LRM Plus
A single ¼" screw is used to attach the GLM 50C to the base of the LRM Plus. Either a #3 Robertson (black) or slot screw driver can be used to remove the screw through a hole in the base. Once the screw is loosened, it will remain “captured” within the block.
Note the small screws at the back of the wooden block. These screws are used to calibrate the angle of the laser measuring device so it will be parallel with the ice surface. Do not adjust these screws.
Remove the battery compartment cover (press latch at front of battery compartment) and remove the 2 AAA cells.
Install 2 new cells and replace the battery cover. Check to make sure the GLM 50C powers up and operates correctly.
Re-attach the GLM50C to the block, holding it in alignment while the screw is tightened.
Tips on Using the LRM
Modes of use
During a curling match there are two situations where the LRM can be deployed. The first being measuring "draw to button", where the absolute distance of a rock from the centre pin needs to be determined. This measurement is frequently used to determine which team gets hammer in the first end and less often to break ties in games such as those played in the "Skins" format. The second situation is to determine shot rock during play of a match. The LRM can be effectively used in both situations and knowing its capabilities can make its use easier for the person making the measurement and those affected by the result. These two situations are covered separately below, but first one should understand how the laser measuring device displays the measurement data and the accuracy of those measurements.
Understanding the Display and the Accuracy of the LRM
The Laser display can be set for imperial (feet and inches) or metric (metres) measurements. With the laser measure turned off, hold the button down for several seconds. The display will alternate between metric and imperial measurements. Release the button to select your choice. For our application, we will assume metric measurements. For the photo on the right, the display reads in metres; however, if we ignore the decimal point, we can read off the measurement in millimetres. This means that the last digit on the right represents a millimetre which is slightly smaller than 40 thousands of an inch as a comparison to Imperial system. This accuracy is more than adequate for all measuring situations and better than most mechanical devices currently used in the sport.
In the photo, the upper reading would be for the first rock measured in shot determination during the play of a match. This reading shows the first rock to be 232 millimetres from the laser reference point. The lower reading indicates the second rock measured is 243 millimetres from the laser reference point. Therefore the first rock measured is shot by 11 millimetres.
It should be noted that the manufacturer of the laser measuring device, Bosch, publishes the measuring accuracy for any off the shelf device as plus or minus three millimetres. However, each laser measuring device incorporated in a RLM has been calibrated to read to within one millimetre which assures that the LRM is capable of the accuracy described in the previous paragraphs.
Measuring Draws to the Button
The major advantages of the LRM for this situation are its accuracy and its ability to easily measure to the dead-centre of the pin. The latter has become increasing important as teams have become very efficient at getting their last rock draws very close to the pin. This capability is due to a set-back in the laser measuring reference point and design of the pin engagement mechanism on the base of the LRM. The measuring reference point is set back 150 millimetres from the dead-centre of the pin which means that 150 millimetres is included any rock measurement. For example if a measured rock reads 200 millimetres on the LRM, it is actually 50 millimetres from the dead-centre of the pin (i.e. 200 - 150 = 50). In most competitions that use draw to the button to determine hammer and the cumulative totals of such draws for tie breaking purposes, the officials enter the measurements in a computer based spreadsheet. Such spreadsheets can be made to automatically include subtracting the 150 millimetre set back from LRM measurements.
Making these measurements is straight forward and can be done by one person no matter how far the rock is from the button. The laser beam should be centered on the rock and this can be done by moving the beam back and forth across the rock's face and watching for the lowest reading. Once this reading is found the operator should depress the laser button and the reading will held on the display for at least four minutes, if not deliberately erased. However, after a limited amount of practice most operators can reliably find the rock's centre by visually centering the beam on the rock. This is possible because the curling rocks are relatively large in diameter (i.e. between 280 and 290 millimetres) and being off-centre by few degrees doesn't significantly affect the results for this type of measurement.
In “The Rules of Curling” as published by the World Curling Federation (WCF) a method for measuring Last Shot Draws (LSDs) that cover the tee is defined. Sections d and e of Rule C8 describe how the distance between the centre of the rock and the tee is determined as follows:
(d) Stones covering the tee will be measured from two locations at the edge of the 4ft circle.
(e) These two locations are at a 90° angle and 0.610 m (2 feet) from the centre hole (the tee).
These two measurements are then entered into a cell phone or tablet app which calculates the distance
between the centre of the rock and the tee. The app, which is called CurlDistance, is provided by the firm Curlit
of Switzerland and uses the calculation method provided by the WCF. CurlDistance has a feature which allows
a user to input the set- back distance of the measuring device that they are using. For the LRM this set-back is 15 cm which when selected allows LRM readings to be input into the app without modification which makes the LRM an ideal measuring device for this kind of measurement.
Measuring to Determine Closest to the Pin during Play
Using the LRM for this measurement is much simpler, quicker and more accurate than the method currently in use. However, it is new and requires learning how to make the measurements needed. It should be noted that there isn't any need to account for the laser measuring reference point set-back when determining which of two or more rocks is closer to the pin. All that matters is the relative difference between the readings. The following is a step by step description of a suggested process for determining which rock is closest to the pin.
- Position LRM on the pin, turn on the laser and point the beam at the first rock to be measured. Move the beam back and forth across the face of the striking band until the minimum reading is found and then depress the laser button. This reading is now displayed and held on the bottom line of the display and the laser beam is turned off. An example of how this appears is shown in Photo 2. Note the LRM in the photo has been equipped with coloured dots to the right of the readings. These dots are lined-up with final position of measurement for the red rock and yellow rock if the red rock is measured first.
- Next depress the button on the laser and turn the LRM until the beam strikes the next rock to be measured. Move the beam back and forth across the face of the striking band until the minimum reading is found and then depress the laser button. This turns off the laser beam and displays and holds this reading on the bottom line of the display. Also, the reading from the previously measured rock is moved to the upper line of the display next to the red dot as shown in Photo 3. If the laser button is not depressed these two readings will be held on the display for at least four minutes.
- The LRM can be lifted from the ice and the readings shown to the opposing thirds and the TV cameras if they are being used for the match. Of course the lowest of the readings is for the rock closest to the pin. For the example shown in Photo 3, the yellow rock is one millimetre closer to the pin than the red.
Things to be aware of
Occasionally, while the laser beam is being moved back and forth over a rock's striking band the laser will oscillate between two readings one millimetre apart. This indicates that the actual distance is somewhere between the two readings. The reading that the laser holds when the button is depressed is the one to use for the measurement.
The GLM 15 display can be set for imperial (feet and inches) or metric (metres) measurements. With the laser measure turned off, hold the button down for several seconds. The display will alternate between metric and imperial measurements. Release the button to select your choice.
Also, there are rare occasions while using the LRM during the play of a match where two rocks that need to be measured are resting quite close to the pin and there isn't room to get the LRM into a position to make the required measurements. However, the designers have developed the LRM Mirror Accessory (LMA) that can be easily attached to the LRM which resolves this situation. A description of the LMA can be found on the Products page.
LRM Compatibility with the Curl Distance App
To use the App for "Last Stone Draws" the distance is measured either from the centre of the house (the Tee) to the nearest point of the stone or, if the stone covers the centre, from two points 2ft away from the centre.
The app calculates the real distance from the centre to the centre of the stone in both cases, using the official formula from the World Curling Federation WCF. Values can be entered for up to six sheets.
If you would like to download more information about Employing a Laser Rock Measure (LRM or LRM Plus) to obtain input readings for the "Curl Distance" App, please click on the following links:
Employing a Laser Rock Measure (LRM) to obtain input readings for the “Curl Distance” App (PDF).
Employing a Laser Rock Measure Plus (LRM+) to obtain input readings for the Curl Distance App (PDF).
Remove one of the screws holding the stainless-steel strap in place with a #0 (yellow) Robertson screwdriver.
Remove the laser measure from the wooden block. Note the small screw at the back of the wooden block. This screw is used to calibrate the angle of the laser measuring device so it will be parallel with the ice surface. Do not adjust this screw.
Remove the battery compartment cover (press latch at front of battery compartment) and remove the 2 AAA cells.
Install 2 new cells and replace the battery cover. Check to make sure the laser measure powers up and operates correctly.
Making sure the laser end faces the front of the LRM, hold the laser measure against the raised lip at the back of the mounting block.
Fit the strap in place and hold securely while you install the screw.
Repeat the Initial Setup procedure before making any new measurements.
Making measurements with the LRM Plus
1. Position the LRM so that the set screw is in the pin.
2. Push the top button to turn the laser “ON”
- Direct the beam at rock to be measured.
- Sweep the rock face for lowest measurement.
3. Push button again to “MAKE and HOLD” the measurement.
- Laser beam will switch off.
- Lowest measurement appears on top line of display.
4. Push bottom button again to clear the display.
5. Repeat for next measurement.
6.Hold bottom button for 3 sec to turn laser “OFF”.
Changing the battery on the LRM Plus
A single ¼" screw is used to attach the GLM 50C to the base of the LRM Plus. Either a #3 Robertson (black) or slot screw driver can be used to remove the screw through a hole in the base. Once the screw is loosened, it will remain “captured” within the block.
Note the small screws at the back of the wooden block. These screws are used to calibrate the angle of the laser measuring device so it will be parallel with the ice surface. Do not adjust these screws.
Remove the battery compartment cover (press latch at front of battery compartment) and remove the 2 AAA cells.
Install 2 new cells and replace the battery cover. Check to make sure the GLM 50C powers up and operates correctly.
Re-attach the GLM50C to the block, holding it in alignment while the screw is tightened.
Tips on Using the LRM
Modes of use
During a curling match there are two situations where the LRM can be deployed. The first being measuring "draw to button", where the absolute distance of a rock from the centre pin needs to be determined. This measurement is frequently used to determine which team gets hammer in the first end and less often to break ties in games such as those played in the "Skins" format. The second situation is to determine shot rock during play of a match. The LRM can be effectively used in both situations and knowing its capabilities can make its use easier for the person making the measurement and those affected by the result. These two situations are covered separately below, but first one should understand how the laser measuring device displays the measurement data and the accuracy of those measurements.
Understanding the Display and the Accuracy of the LRM
The Laser display can be set for imperial (feet and inches) or metric (metres) measurements. With the laser measure turned off, hold the button down for several seconds. The display will alternate between metric and imperial measurements. Release the button to select your choice. For our application, we will assume metric measurements. For the photo on the right, the display reads in metres; however, if we ignore the decimal point, we can read off the measurement in millimetres. This means that the last digit on the right represents a millimetre which is slightly smaller than 40 thousands of an inch as a comparison to Imperial system. This accuracy is more than adequate for all measuring situations and better than most mechanical devices currently used in the sport.
In the photo, the upper reading would be for the first rock measured in shot determination during the play of a match. This reading shows the first rock to be 232 millimetres from the laser reference point. The lower reading indicates the second rock measured is 243 millimetres from the laser reference point. Therefore the first rock measured is shot by 11 millimetres.
It should be noted that the manufacturer of the laser measuring device, Bosch, publishes the measuring accuracy for any off the shelf device as plus or minus three millimetres. However, each laser measuring device incorporated in a RLM has been calibrated to read to within one millimetre which assures that the LRM is capable of the accuracy described in the previous paragraphs.
Measuring Draws to the Button
The major advantages of the LRM for this situation are its accuracy and its ability to easily measure to the dead-centre of the pin. The latter has become increasing important as teams have become very efficient at getting their last rock draws very close to the pin. This capability is due to a set-back in the laser measuring reference point and design of the pin engagement mechanism on the base of the LRM. The measuring reference point is set back 150 millimetres from the dead-centre of the pin which means that 150 millimetres is included any rock measurement. For example if a measured rock reads 200 millimetres on the LRM, it is actually 50 millimetres from the dead-centre of the pin (i.e. 200 - 150 = 50). In most competitions that use draw to the button to determine hammer and the cumulative totals of such draws for tie breaking purposes, the officials enter the measurements in a computer based spreadsheet. Such spreadsheets can be made to automatically include subtracting the 150 millimetre set back from LRM measurements.
Making these measurements is straight forward and can be done by one person no matter how far the rock is from the button. The laser beam should be centered on the rock and this can be done by moving the beam back and forth across the rock's face and watching for the lowest reading. Once this reading is found the operator should depress the laser button and the reading will held on the display for at least four minutes, if not deliberately erased. However, after a limited amount of practice most operators can reliably find the rock's centre by visually centering the beam on the rock. This is possible because the curling rocks are relatively large in diameter (i.e. between 280 and 290 millimetres) and being off-centre by few degrees doesn't significantly affect the results for this type of measurement.
In “The Rules of Curling” as published by the World Curling Federation (WCF) a method for measuring Last Shot Draws (LSDs) that cover the tee is defined. Sections d and e of Rule C8 describe how the distance between the centre of the rock and the tee is determined as follows:
(d) Stones covering the tee will be measured from two locations at the edge of the 4ft circle.
(e) These two locations are at a 90° angle and 0.610 m (2 feet) from the centre hole (the tee).
These two measurements are then entered into a cell phone or tablet app which calculates the distance
between the centre of the rock and the tee. The app, which is called CurlDistance, is provided by the firm Curlit
of Switzerland and uses the calculation method provided by the WCF. CurlDistance has a feature which allows
a user to input the set- back distance of the measuring device that they are using. For the LRM this set-back is 15 cm which when selected allows LRM readings to be input into the app without modification which makes the LRM an ideal measuring device for this kind of measurement.
Measuring to Determine Closest to the Pin during Play
Using the LRM for this measurement is much simpler, quicker and more accurate than the method currently in use. However, it is new and requires learning how to make the measurements needed. It should be noted that there isn't any need to account for the laser measuring reference point set-back when determining which of two or more rocks is closer to the pin. All that matters is the relative difference between the readings. The following is a step by step description of a suggested process for determining which rock is closest to the pin.
- Position LRM on the pin, turn on the laser and point the beam at the first rock to be measured. Move the beam back and forth across the face of the striking band until the minimum reading is found and then depress the laser button. This reading is now displayed and held on the bottom line of the display and the laser beam is turned off. An example of how this appears is shown in Photo 2. Note the LRM in the photo has been equipped with coloured dots to the right of the readings. These dots are lined-up with final position of measurement for the red rock and yellow rock if the red rock is measured first.
- Next depress the button on the laser and turn the LRM until the beam strikes the next rock to be measured. Move the beam back and forth across the face of the striking band until the minimum reading is found and then depress the laser button. This turns off the laser beam and displays and holds this reading on the bottom line of the display. Also, the reading from the previously measured rock is moved to the upper line of the display next to the red dot as shown in Photo 3. If the laser button is not depressed these two readings will be held on the display for at least four minutes.
- The LRM can be lifted from the ice and the readings shown to the opposing thirds and the TV cameras if they are being used for the match. Of course the lowest of the readings is for the rock closest to the pin. For the example shown in Photo 3, the yellow rock is one millimetre closer to the pin than the red.
Things to be aware of
Occasionally, while the laser beam is being moved back and forth over a rock's striking band the laser will oscillate between two readings one millimetre apart. This indicates that the actual distance is somewhere between the two readings. The reading that the laser holds when the button is depressed is the one to use for the measurement.
The GLM 15 display can be set for imperial (feet and inches) or metric (metres) measurements. With the laser measure turned off, hold the button down for several seconds. The display will alternate between metric and imperial measurements. Release the button to select your choice.
Also, there are rare occasions while using the LRM during the play of a match where two rocks that need to be measured are resting quite close to the pin and there isn't room to get the LRM into a position to make the required measurements. However, the designers have developed the LRM Mirror Accessory (LMA) that can be easily attached to the LRM which resolves this situation. A description of the LMA can be found on the Products page.
LRM Compatibility with the Curl Distance App
To use the App for "Last Stone Draws" the distance is measured either from the centre of the house (the Tee) to the nearest point of the stone or, if the stone covers the centre, from two points 2ft away from the centre.
The app calculates the real distance from the centre to the centre of the stone in both cases, using the official formula from the World Curling Federation WCF. Values can be entered for up to six sheets.
If you would like to download more information about Employing a Laser Rock Measure (LRM or LRM Plus) to obtain input readings for the "Curl Distance" App, please click on the following links:
Employing a Laser Rock Measure (LRM) to obtain input readings for the “Curl Distance” App (PDF).
Employing a Laser Rock Measure Plus (LRM+) to obtain input readings for the Curl Distance App (PDF).
Changing the battery on the LRM Plus
A single ¼" screw is used to attach the GLM 50C to the base of the LRM Plus. Either a #3 Robertson (black) or slot screw driver can be used to remove the screw through a hole in the base. Once the screw is loosened, it will remain “captured” within the block.
Note the small screws at the back of the wooden block. These screws are used to calibrate the angle of the laser measuring device so it will be parallel with the ice surface. Do not adjust these screws.
Remove the battery compartment cover (press latch at front of battery compartment) and remove the 2 AAA cells.
Install 2 new cells and replace the battery cover. Check to make sure the GLM 50C powers up and operates correctly.
Re-attach the GLM50C to the block, holding it in alignment while the screw is tightened.
Tips on Using the LRM
Modes of use
During a curling match there are two situations where the LRM can be deployed. The first being measuring "draw to button", where the absolute distance of a rock from the centre pin needs to be determined. This measurement is frequently used to determine which team gets hammer in the first end and less often to break ties in games such as those played in the "Skins" format. The second situation is to determine shot rock during play of a match. The LRM can be effectively used in both situations and knowing its capabilities can make its use easier for the person making the measurement and those affected by the result. These two situations are covered separately below, but first one should understand how the laser measuring device displays the measurement data and the accuracy of those measurements.
Understanding the Display and the Accuracy of the LRM
The Laser display can be set for imperial (feet and inches) or metric (metres) measurements. With the laser measure turned off, hold the button down for several seconds. The display will alternate between metric and imperial measurements. Release the button to select your choice. For our application, we will assume metric measurements. For the photo on the right, the display reads in metres; however, if we ignore the decimal point, we can read off the measurement in millimetres. This means that the last digit on the right represents a millimetre which is slightly smaller than 40 thousands of an inch as a comparison to Imperial system. This accuracy is more than adequate for all measuring situations and better than most mechanical devices currently used in the sport.
In the photo, the upper reading would be for the first rock measured in shot determination during the play of a match. This reading shows the first rock to be 232 millimetres from the laser reference point. The lower reading indicates the second rock measured is 243 millimetres from the laser reference point. Therefore the first rock measured is shot by 11 millimetres.
It should be noted that the manufacturer of the laser measuring device, Bosch, publishes the measuring accuracy for any off the shelf device as plus or minus three millimetres. However, each laser measuring device incorporated in a RLM has been calibrated to read to within one millimetre which assures that the LRM is capable of the accuracy described in the previous paragraphs.
Measuring Draws to the Button
The major advantages of the LRM for this situation are its accuracy and its ability to easily measure to the dead-centre of the pin. The latter has become increasing important as teams have become very efficient at getting their last rock draws very close to the pin. This capability is due to a set-back in the laser measuring reference point and design of the pin engagement mechanism on the base of the LRM. The measuring reference point is set back 150 millimetres from the dead-centre of the pin which means that 150 millimetres is included any rock measurement. For example if a measured rock reads 200 millimetres on the LRM, it is actually 50 millimetres from the dead-centre of the pin (i.e. 200 - 150 = 50). In most competitions that use draw to the button to determine hammer and the cumulative totals of such draws for tie breaking purposes, the officials enter the measurements in a computer based spreadsheet. Such spreadsheets can be made to automatically include subtracting the 150 millimetre set back from LRM measurements.
Making these measurements is straight forward and can be done by one person no matter how far the rock is from the button. The laser beam should be centered on the rock and this can be done by moving the beam back and forth across the rock's face and watching for the lowest reading. Once this reading is found the operator should depress the laser button and the reading will held on the display for at least four minutes, if not deliberately erased. However, after a limited amount of practice most operators can reliably find the rock's centre by visually centering the beam on the rock. This is possible because the curling rocks are relatively large in diameter (i.e. between 280 and 290 millimetres) and being off-centre by few degrees doesn't significantly affect the results for this type of measurement.
In “The Rules of Curling” as published by the World Curling Federation (WCF) a method for measuring Last Shot Draws (LSDs) that cover the tee is defined. Sections d and e of Rule C8 describe how the distance between the centre of the rock and the tee is determined as follows: (d) Stones covering the tee will be measured from two locations at the edge of the 4ft circle. (e) These two locations are at a 90° angle and 0.610 m (2 feet) from the centre hole (the tee). These two measurements are then entered into a cell phone or tablet app which calculates the distance between the centre of the rock and the tee. The app, which is called CurlDistance, is provided by the firm Curlit of Switzerland and uses the calculation method provided by the WCF. CurlDistance has a feature which allows a user to input the set- back distance of the measuring device that they are using. For the LRM this set-back is 15 cm which when selected allows LRM readings to be input into the app without modification which makes the LRM an ideal measuring device for this kind of measurement.
Measuring to Determine Closest to the Pin during Play
Using the LRM for this measurement is much simpler, quicker and more accurate than the method currently in use. However, it is new and requires learning how to make the measurements needed. It should be noted that there isn't any need to account for the laser measuring reference point set-back when determining which of two or more rocks is closer to the pin. All that matters is the relative difference between the readings. The following is a step by step description of a suggested process for determining which rock is closest to the pin.
- Position LRM on the pin, turn on the laser and point the beam at the first rock to be measured. Move the beam back and forth across the face of the striking band until the minimum reading is found and then depress the laser button. This reading is now displayed and held on the bottom line of the display and the laser beam is turned off. An example of how this appears is shown in Photo 2. Note the LRM in the photo has been equipped with coloured dots to the right of the readings. These dots are lined-up with final position of measurement for the red rock and yellow rock if the red rock is measured first.
- Next depress the button on the laser and turn the LRM until the beam strikes the next rock to be measured. Move the beam back and forth across the face of the striking band until the minimum reading is found and then depress the laser button. This turns off the laser beam and displays and holds this reading on the bottom line of the display. Also, the reading from the previously measured rock is moved to the upper line of the display next to the red dot as shown in Photo 3. If the laser button is not depressed these two readings will be held on the display for at least four minutes.
- The LRM can be lifted from the ice and the readings shown to the opposing thirds and the TV cameras if they are being used for the match. Of course the lowest of the readings is for the rock closest to the pin. For the example shown in Photo 3, the yellow rock is one millimetre closer to the pin than the red.
Things to be aware of
Occasionally, while the laser beam is being moved back and forth over a rock's striking band the laser will oscillate between two readings one millimetre apart. This indicates that the actual distance is somewhere between the two readings. The reading that the laser holds when the button is depressed is the one to use for the measurement.
The GLM 15 display can be set for imperial (feet and inches) or metric (metres) measurements. With the laser measure turned off, hold the button down for several seconds. The display will alternate between metric and imperial measurements. Release the button to select your choice.
Also, there are rare occasions while using the LRM during the play of a match where two rocks that need to be measured are resting quite close to the pin and there isn't room to get the LRM into a position to make the required measurements. However, the designers have developed the LRM Mirror Accessory (LMA) that can be easily attached to the LRM which resolves this situation. A description of the LMA can be found on the Products page.
LRM Compatibility with the Curl Distance App
To use the App for "Last Stone Draws" the distance is measured either from the centre of the house (the Tee) to the nearest point of the stone or, if the stone covers the centre, from two points 2ft away from the centre.
The app calculates the real distance from the centre to the centre of the stone in both cases, using the official formula from the World Curling Federation WCF. Values can be entered for up to six sheets.
If you would like to download more information about Employing a Laser Rock Measure (LRM or LRM Plus) to obtain input readings for the "Curl Distance" App, please click on the following links: Employing a Laser Rock Measure (LRM) to obtain input readings for the “Curl Distance” App (PDF). Employing a Laser Rock Measure Plus (LRM+) to obtain input readings for the Curl Distance App (PDF).